
The Good, the Bad and the Ugly
Who said that only grand champions could write bridge articles? A few months ago, Funbridge launched a brand-new format of articles that allow talented players to share their expertise on the deals that inspire them the most. We have the pleasure of presenting you with a captivating article below that was written by one of the members of our community.
Zoom is on the author
Yoram Aviram is an experienced bridge player and a former member of the Israeli Junior and Open teams with several achievements on the national and international scenes.
Yoram left the game many years ago to focus on family and work (in the field of computerised trading of financial instruments) and switching hobbies from the mind sport of bridge to the physical sport of competitive road cycling.
After returning to his old passion and adopting Funbridge as the platform on which to refresh his old skills, he is now back on the Israeli Open team heading to the 2024 European Championships in Denmark.
He is happy to share deals of particular interest with the Funbridge community on the blog.

The bad, the ugly and the good
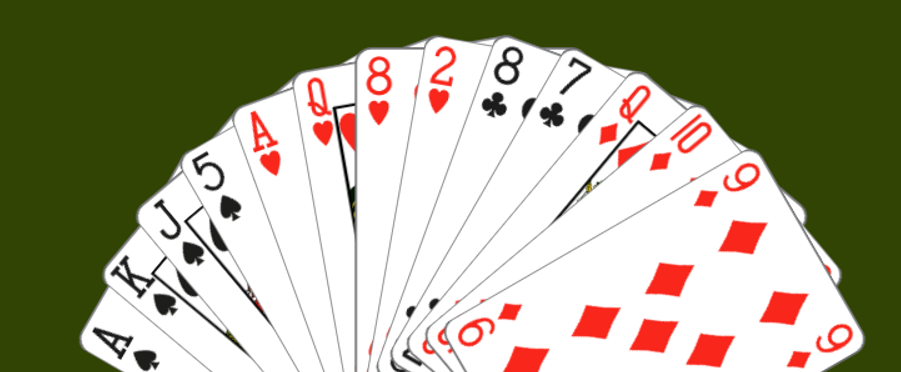
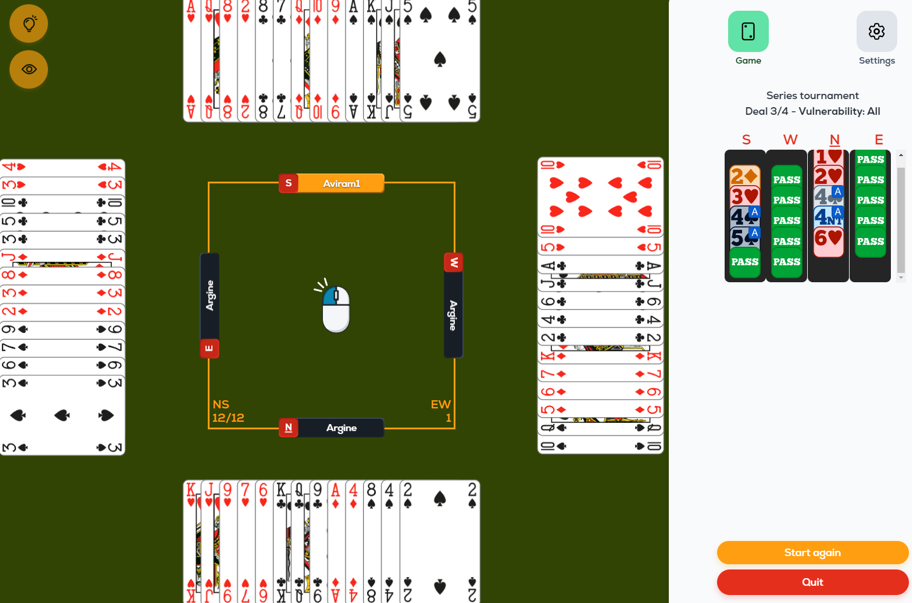
There is special satisfaction in bringing home a bad contract with some good play. The following hand is a nice example. In one of the elite series tournament, I held the following cards:
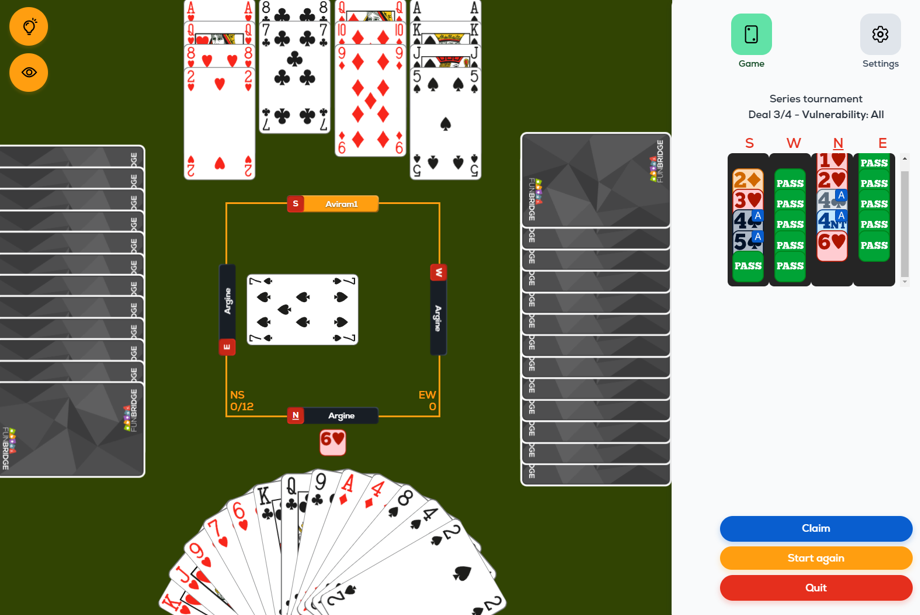
Partner was Dealer and surprisingly, he opened 1♥. East passed and I had a typical “Arginian” problem: I had a strong hand with a strong fit. Slam was a possible option. Argine and I play “Jacoby 2NT” as a game-forcing major raise, and that seemed to be the obvious choice with my hand. However, Argine’s rules require a rebid of 4 in the major with any hand of up to 14 points. I could easily imagine some minimal hands for Partner which would make a slam, but after the expected 4♥ response, it would not be possible to investigate. I considered a 1♠ response, but if I followed my first bid with a jump raise in Hearts, that would be non-forcing, just an invitation to game. In those situations, I found that the easiest way to show a fit and to invite to slam was to respond 2 in a minor following with 3 in a major. This is definitely showing slam interest with at least 13 points, which quite matched my hand.
Of the two minors, the closest to a suit was Diamonds, for this reason I improvised a 2♦ response. Partner rebid 2♥ with no special meaning and, as planned, I bid 3♥ to show my slam interest. Partner kindly followed with 4♣ – a cue bid. That turned out to be of no help! I was still in an awkward position. I did have some extras, but I still needed some support from Partner. Asking for key cards would not really help since what I really needed from Partner was some extra values or shape. Finally, I decided to cue bid 4♠. Getting to the 5-level was a risk, but at least I was hoping that Argine would stay off slam with a minimum hand.
Argine now took leadership with a 4NT bid asking for key cards. I showed them with 5♠ and Argine bid small slam. East led the ♠7 and Dummy came down (hands reversed for convenience):
Well, it seemed that my “sophisticated” bidding tactic concluded in a fair reward – a terrible slam. With a possible loser in each side suit, even a 5-level contract would have been in danger.
I could, of course, put the blame on Argine for driving me to slam with its balanced 13 count, but it was still my responsibility. Anyway, it was time to plan the play. The club Ace was an unavoidable loser, so I couldn’t afford to lose neither a spade nor a diamond. The only obvious chance was to find spades 3-3 and the Queen onside for the finesse.
I could take the spade finesse later, so now I played the Ace from Dummy, East dropping the 10. The 10… that was interesting. Let’s think about the spade position: East led the 7. There are the 3 and 6 below that, the 9 and Queen above. I needed East to hold the Queen-third. He could have Q97, but that would mean that Argine dropped the 10 from 1063. With a good human opponent, it is likely to happen, but Argine, although it is not human, is a good opponent. It doesn’t drop 10s as false cards. Its 10, I’m sure, is an honest card, so it has got either 10 singleton, 109 or Q10. What about West with the lead of the 7? Defenders led 3rd/5th. With 5 cards, East would have led the smallest, so West’s 10 was not a singleton. With Q763, East would have led his third best, the 6, so West didn’t have the 109 either. It followed that West was likely to have the Q10 doubleton.
Well, I thought that I could drop West’s spade Queen and therefore avoid a spade loser, but that would still leave me with a diamond loser. I needed one more winner in Spades or Diamonds (an extra club winner was of no use as a discard from Dummy didn’t help). I checked the spade spots, but I saw that after the drop of the Queen, Dummy’s J5 were not enough against East’s 96.
Sometimes a missing trick is an invitation for a squeeze. East, I assumed, held the spade guard. If in addition he also held the diamond guard, he might be squeezed!
Enough thinking. Time to play. I played the ♥A and a club from Dummy. East took his Ace and continued with a club to my King. I played the ♥J, both opponents following. Now a spade to Dummy’s King, West’s Queen dropping as expected. One overcome problem. Now let’s face the second issue: I needed East to guard the diamonds. If East had the ♦K, he would be squeezed when I would run my winners. There was one more option though. If it was West who initially held the diamond guard – the ♦K, and East the ♦J, the guard could be transferred: I had to play the Queen of Diamonds from Dummy. If West covered, I would take the Ace and now, again, East would guard the suit with his Jack under Dummy’s 10.
The end position would be:
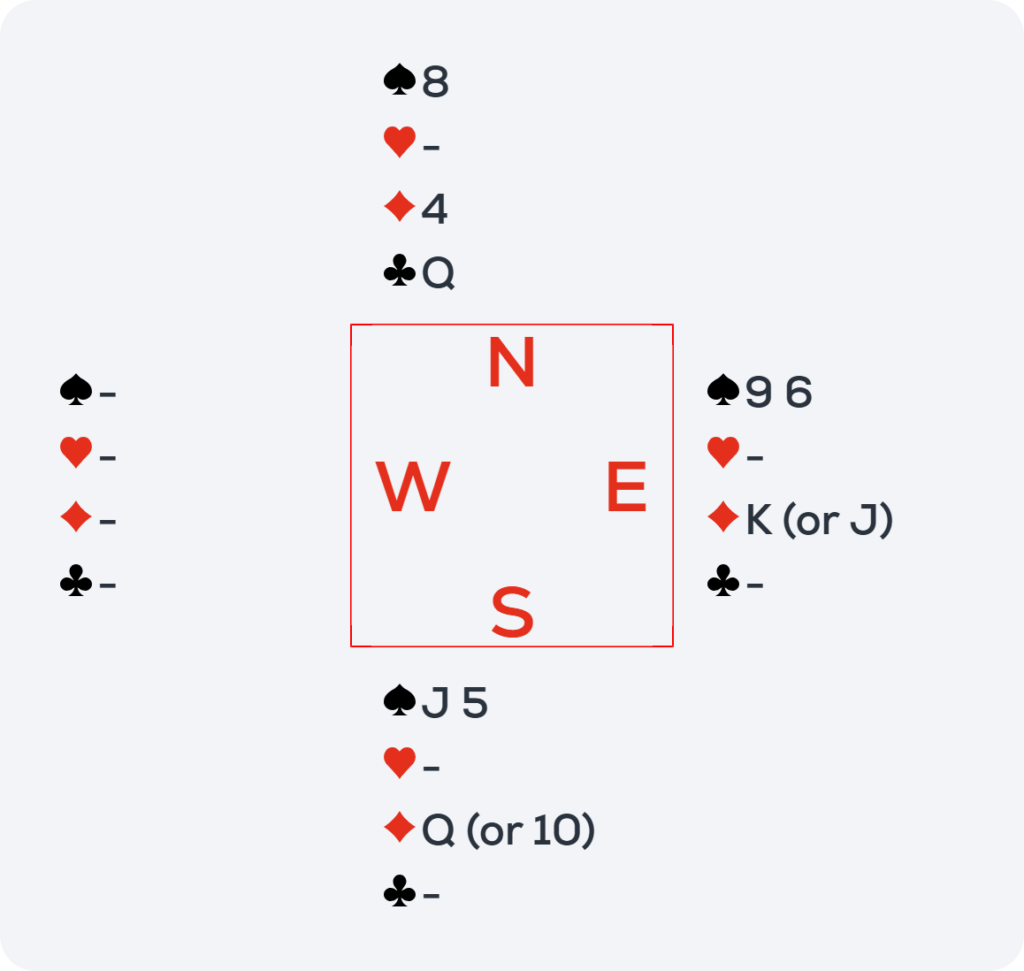
When Declarer now played the high ♣Q, East would have to give up a winner and the contract would make. Who held the ♦K then?
I couldn’t be sure, but I had a little hint. After winning his club Ace, it would be logical and natural for West to play a diamond unless, of course, he had the King. It was by no means 100% sure, just a slight indication, more like a “restricted choice”. Without the King, West might return a diamond or not. With the King, he probably wouldn’t.
That clue was better than nothing, and besides, the Queen play was more impressive, so I played the ♦Q from Dummy. West played low. I could still go up with the Ace, playing East for KJ, but West could still have the King. He could “see” the upcoming squeeze and not cover. Accordingly, I played low and won the trick! The diamond honours were divided as I hoped, West had the King, East had the Jack. I claimed the remaining cards. Slam made!
Those were the full hand:
A satisfying 100% score. A bad bid that led to an ugly contract, saved by a good play!
What is the concept behind community articles?
Would you also like to write an article? At Funbridge, we like giving our players a voice. In this format of articles, it is you who write the content. If you notice a deal that you find particularly interesting and that you would like to share with the Funbridge community, tell us in a comment below! We will get back to you quickly.

Content Manager
What did you think of this article?
Share your opinion in the Comments Section below.


Very interesting, thanks
I love the over your shoulder discussion Aviram and can relate to all the challenges in the bidding and play. Well done!